Views: 0 Author: Site Editor Publish Time: 2025-10-20 Origin: Site


You use a dry laminator to seal and protect papers. It uses heat and pressure, not liquid glue. The machine covers your papers with a clear sticky film. This makes them strong and helps them last longer. In a busy classroom or office, you can laminate many sheets at once. This saves time and uses less material. Roll laminators press evenly, so your papers look neat and tidy. Many teachers think these machines are important for keeping things safe and organized.
A dry laminator uses heat and pressure to seal papers. This makes papers strong and last longer. - You must prepare first. Clean your papers well. Pick the right pouch size. This helps you get the best lamination. - Let the laminator heat up all the way before you use it. This stops bubbles and gives a smooth finish. - Take care of your laminator often. Clean the rollers and check for damage. This helps your laminator last for years. - Pick the right laminator for your needs. Pouch laminators are small and easy to use. Roll laminators are better for big projects.
A dry laminator keeps your important papers safe. People use it in schools, offices, and other places. This machine uses heat and pressure to seal a clear film on paper. You do not need any liquid glue for this. The process is quick and does not make a mess. That is why many people like to use it when they are busy.
Heat and pressure help the lamination work well. When you put your paper and film in a thermal laminator, the machine heats the sticky layer on the film. The heat makes the adhesive sticky. The rollers press the film onto your paper. This makes a strong bond that keeps your paper safe from spills, rips, and dirt.
Tip: Heat and pressure work together to give you a smooth finish with no bubbles. For the best results, let the laminator get hot before you use it.
The science behind this is easy to understand. Heat softens the adhesive, and pressure helps the film stick evenly. The table below explains these ideas:
| Principle | Explanation |
|---|---|
| Adhesion | Heat makes adhesives stick better and bond well. |
| Pressure | Pressure helps the film touch the paper everywhere for a strong bond. |
| Material Properties | The type of materials you use can change how well lamination works. |
A thermal laminator is a good way to keep your papers safe. You do not have to wait for glue to dry, so you save time.
The adhesive film is very important for lamination. You use a special film with glue already on one side. When you put it in the thermal laminator, the heat melts the glue, and the pressure sticks it to your paper. This way is much cleaner than using liquid glue.
There are different adhesive films for different jobs:
Packaging films help make packages stronger and last longer.
In electronics and displays, films bond thin layers and circuit boards. This keeps things neat and clean.
Car interiors use films to stick fabrics and plastics together for a nice look.
Clothing makers use films to laminate fabrics, so clothes can be waterproof and let air through.
Medical devices and packaging use films for strong, clean bonds.
If you look at dry and wet lamination, you will see some big differences. The table below shows how each one works:
| Feature | Wet Lamination | Dry Lamination |
|---|---|---|
| Adhesive Type | Uses liquid glue (solvent or water-based) | Uses film with glue already on it (no solvent) |
| Application Method | A machine puts glue on the paper | Film with glue sticks using heat and pressure |
| Drying Time | Needs time to dry before you can use it | No drying time, so it is faster |
| Environmental Impact | Can cause problems with chemicals in the air | Better for the environment |
| Bonding Quality | Makes a strong bond and looks clear | Gives a neat, high-quality finish every time |
A dry laminator is faster and cleaner to use. You do not have to wait for glue to dry or clean up a mess. A thermal laminator helps you get a neat, high-quality result every time.
You need to prepare your documents before you start using a laminator. Good preparation helps you get the best results and keeps your machine running smoothly. Follow these steps to get ready:
Pick a pouch or sleeve that fits your document. Make sure it is at least 1/8 inch bigger on all sides.
Clean your document. Remove any dust or dirt. You can use a dry towel for this.
Place your document between the two sheets of the laminating sleeve. Keep it centered so it does not stick out.
Double-check that the document sits flat and does not have any folds or wrinkles.
Tip: A clean and flat document will help you avoid bubbles and wrinkles after lamination.
Once you have prepared your document, you can feed it into the laminator. This step is important for a smooth finish. Here is how you do it:
Wait until the thermal laminator is fully heated. Most machines have a ready light.
Insert the sealed end of the pouch into the machine first. This helps prevent jams.
Make sure the pouch is centered and straight. If it is off-center, the film may not seal well.
Do not use wrinkled or folded documents. These can cause jams.
Never force the pouch through the laminator. Let the rollers pull it in at their own speed.
Note: Using pouches with enough margin space gives you a better seal and protects the edges of your document.
The heating step is where the magic happens. The thermal laminator uses heat to melt the adhesive on the film. The rollers press the film onto your document, making a strong seal. You need the right temperature for the best results. Most dry laminators work well in these temperature ranges:
| Temperature Range | Description |
|---|---|
| 150ºF - 225ºF | Good for most dry mount adhesives and films |
| 180ºF | Common base temperature for many projects |
You should always let your machine reach the correct temperature before you start. If the laminator is too cool, the film may not stick well. If it is too hot, the film can warp or bubble.
After the document comes out of the laminator, you need to finish the process. This step helps your work look neat and last longer.
Let the laminated sheet cool on a flat surface. This keeps it from curling.
Trim the edges if needed. Leave a small border to keep the seal strong.
Check for bubbles or wrinkles. If you see any, review your preparation and feeding steps for next time.
Tip: Store your finished sheets flat to keep them looking new.
A dry laminator makes it easy to protect your papers. When you follow each step, you get a clean, strong finish every time. You can use a thermal laminator for school projects, office signs, or important records. The process is simple, but each step matters for the best results.
Rollers are very important in every thermal laminator. They press the film onto your paper and help the adhesive stick well. Special materials make rollers work better. Katsura WACK can handle lots of pressure and does not wear out fast. White H200 keeps the roller from cracking. The right rubber hardness, between 70 and 90 Shore A, makes rollers strong and bendy.
| Material | Properties | Impact on Lamination Quality |
|---|---|---|
| Katsura WACK | Handles pressure and does not wear out quickly | Makes lamination last longer and stay even |
| White H200 | Bouncy and stops cracks | Rollers last longer and work smoothly |
| Rubber Hardness | 70-90 Shore A | Rollers are strong but can still bend |
Heating elements give the heat needed to melt the glue on the film. You need these to get the right temperature for each job. The heat should stay steady and even for the best results. If the heating elements do not work right, you might see bubbles or weak spots. Good heating elements help you get a clear and strong finish.
Modern thermal laminators have simple controls. You can change the speed and temperature for different jobs. Many machines have color LCD screens that show the settings. Some use special film to set the machine by itself. These features help you get good results without guessing.
| Feature | Description |
|---|---|
| Color LCD Screen | Shows settings and is easy to use |
| Variable Speed & Temp Controls | Lets you change for different papers |
| Automatic Film Settings | Special film sets the controls for you |
You must always be careful when using a laminator. Many machines have safety light curtains that stop the machine if you reach in. Emergency stop buttons let you turn off the machine fast. Interlocking guards keep you away from moving parts. Overload protection stops the machine if it works too hard. Always wear gloves and safety glasses. Keep your hands and jewelry away from rollers and hot parts. Never try to fix the machine while it is on or hot.
Safety light curtains make an invisible wall to protect you.
Emergency stop buttons help you turn off the machine quickly.
Interlocking guards stop you from touching dangerous parts.
Overload protection keeps the machine safe.
Always wear safety gear and follow the rules.
Tip: Good safety features keep you safe and help your thermal laminator last a long time.
Teachers can pick from two main laminator types. Pouch laminators use small plastic pouches. You put your paper inside the pouch. Then you feed it into the machine. Roll laminators use big rolls of film. These can cover larger things. They need more space in your classroom or workroom.
Here is a quick comparison:
| Feature | Pouch Laminators | Roll Laminators |
|---|---|---|
| Cost | Hundreds of dollars | Thousands of dollars |
| Size Variability | Limited to smaller projects | Larger throat width for bigger jobs |
| Project Suitability | Ideal for small projects | Suitable for larger projects |
| Finishing Requirements | No trimming needed | Requires trimming and corner rounding |
Pouch laminators are easy to move and good for small jobs. You can use them for ID badges or signs. Roll laminators are better for big classroom needs. They work well for posters or banners. If you want a strong machine, pick a roll laminator. It can handle large projects but costs more.
You want a laminator that is simple to use. Pouch laminators are easier. You slide your paper into the pouch and feed it in. Many teachers like models such as the Fellowes Saturn 3i. It heats up quickly and has easy controls. You do not need to trim the edges after using pouches. This saves time when you are busy.
Roll laminators can laminate many sheets at once. You must trim and round the corners after. These machines are good for teacher workrooms with lots of big jobs. Most teachers want laminators with features that make classroom work easy.
Portability is important if you move between rooms or need to store your machine. The best portable choice is a pouch laminator. Models like the Amazon Basics Thermal Laminator are small and easy to carry. Personal laminators fit in cabinets or on shelves. You can use them with different pouch sizes, from small cards to letter sheets.
If you want to save money, pick a pouch laminator. These cost less and work well for most classroom jobs. Roll laminators are not easy to move, but they help with big projects in one place.
Tip: Check reviews before you buy. Pick a laminator with good features, fast warm-up, and simple controls. The best laminators for teachers help you protect classroom materials, save time, and stick to your budget.
If you want the best laminator for teachers, look for one that does everything well. Teachers need a machine that works fast and lasts a long time. Brands like D&K, Akiles, and Tamerica are known for being strong and reliable. These brands make machines that teachers trust.
A good laminator should work well every time you use it. This is important if you use it a lot. The best ones can handle many paper types and sizes. Some, like Bonsaii, can even do A3 size. Most teachers use A4, but bigger sizes help with large projects. Reading reviews can show how well each model works in real classrooms. Many teachers say D&K and Akiles machines last for years. They keep working even after lots of use. This means they are very strong.
| Metric | Description |
|---|---|
| Input Size | Most laminators handle up to A4 size; larger options like Bonsaii handle A3. |
| Warm Up / Preheat Speed | Industry standard is about 5 minutes; Scotch TL1302VP warms up in 1 minute. |
| Lamination Speed | Standard is 12 inches per minute; Scotch TL906 can laminate at 15 inches per minute. |
| Run Time | Standard run time is 30 minutes; monitor to prevent overheating. |
| Brand | Scotch is considered a premium brand in the lamination category. |
Speed is important when you have lots of work. A fast laminator saves you time. You do not have to wait long for it to get hot. Some, like the Scotch TL1302VP, heat up in one minute. Most others take about five minutes. If you need to laminate many sheets, speed helps you finish quickly. The Scotch TL906 can do 15 inches each minute. Most machines do 12 inches per minute. You want a machine that can keep up with your busy class. Fast speed also means students do not have to wait.
Tip: Always check how fast the laminator works before you buy. Faster machines help you finish more projects in less time.
Quality is very important for teachers. You want your laminator to make clear, smooth pages with no bubbles. The best machines use even heat and strong rollers. This gives you neat results every time. Durability matters too. D&K, Akiles, and Tamerica make machines that last for years. You can trust these brands to work well for a long time. Many teachers say these models are their favorite because they are fast, strong, and make good results. You get a machine that helps you every day and lasts a long time.
When you pick a dry laminator for your school or office, you want to match your workflow and document needs. You should look at size, speed, and how easy the machine is to use. Many teachers need a thermal laminator that can handle lots of papers every day. You also want a machine that lasts a long time and does not break down often.
You need to think about the size of documents you want to laminate. Some thermal laminators work with small sheets, while others can handle posters or banners. The speed of the machine matters if you have many papers to laminate. Fast warm-up and high-speed models help you finish jobs quickly. The table below shows how different models fit small, medium, or high-volume needs:
| Volume Category | Model | Width | Speed | Film Range | Warm-Up | Max Thickness | Notable Features |
|---|---|---|---|---|---|---|---|
| Small | CL-27SD | 27 in | 3 ft/min | 1.5–3 mil | ~10 min | 3/16 in | Compact, LED controls |
| Small | CL-40SD | 40 in | 3 ft/min | 1.5–3 mil | ~10 min | 3/16 in | Wide-format, safety shield |
| Medium | CL-40DX | 40 in | 9 ft/min | 1.5–5 mil | ~10 min | 3/16 in | Trimmer, variable temperature |
| Medium | CL-27PR | 27 in | 9 ft/min | 1.5–10 mil | ~10 min | 3/16 in | Cooling fans, dual core support |
| High | HLA-2301 | 12.6 in | Up to 68 in/min | 1.5–10 mil | <5 min | 16 mil | Auto feed tray, dual trimming |
| High | HLA-2501 | 12.6 in | 20–67 in/min | 1.2–5 mil | ~6.5 min | 16 mil | Micro-trimming, multi-position |
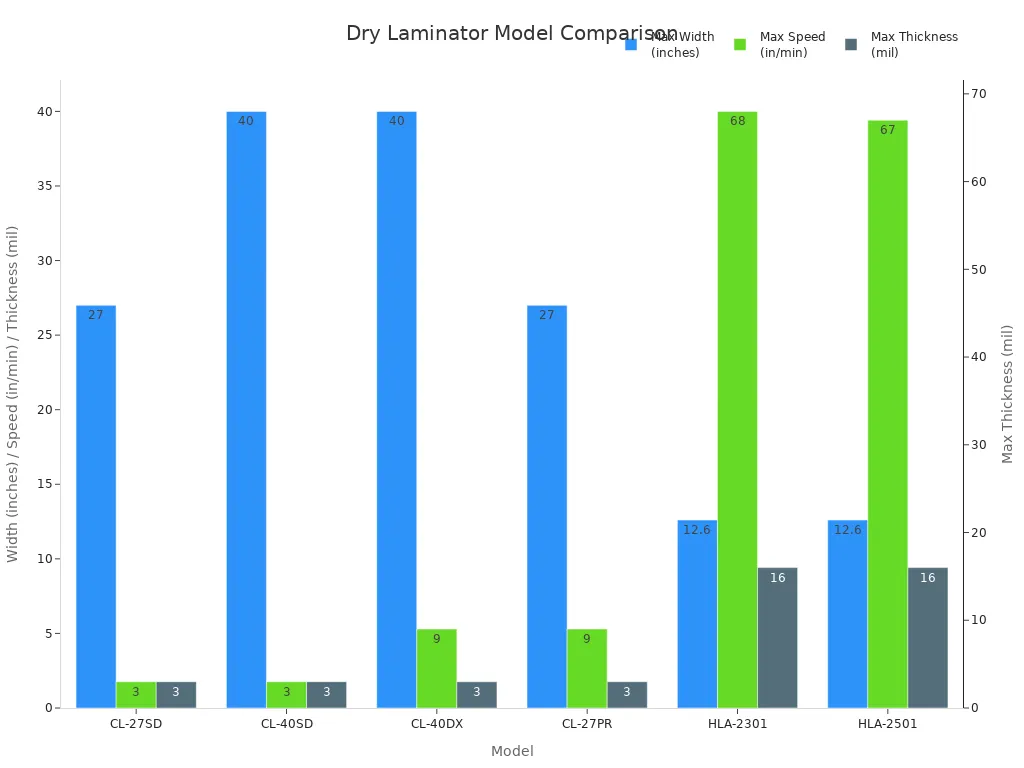
Tip: Choose a thermal laminator with the right width and speed for your classroom or office. This helps you work faster and keeps your projects looking neat.
You want your laminator to last for years. Regular care keeps it running smoothly and helps you avoid problems. Follow these steps to keep your thermal laminator in good shape:
Clean the rollers and inside parts often. This stops jams and keeps your papers smooth.
Do not overload the machine. Use the speed settings that the guide suggests.
Store your laminator in a dry, clean place. Handle it gently.
Check for wear and damage. Schedule professional maintenance if needed.
Lubricate moving parts so they do not wear out.
Note: Clean and dust your machine often. Lubricate rollers and gears. Check rollers for wear and make sure they line up right.
Safety matters when you use a thermal laminator in schools or offices. You should follow simple rules to keep everyone safe:
| Safety Guideline | Description |
|---|---|
| Avoid thick items | Do not laminate thick or odd-shaped things unless the guide says so |
| Store pouches properly | Keep pouches in a cool, dry place |
| Warm up the machine | Let the laminator heat up before you start |
| Feed pouches gently | Insert the sealed end first and let the machine pull it through |
| Cool laminated items | Lay items flat to cool so they do not curl |
| Power off after use | Unplug and let the machine cool before storing |
| Ergonomic setup | Set the laminator at a good height and take breaks during big jobs |
| Clean the rollers | Use a cleaning sheet sometimes to keep rollers working well |
Do not laminate items with wet glue.
Remove staples before laminating.
Do not lean forward while the laminator runs.
Tip: Always read the guidebook before you use a new thermal laminator. This helps you avoid mistakes and keeps you safe.
Teachers who follow these steps get better results and keep their machines working longer.
You may face some common problems when using a thermal laminator. Knowing how to fix these issues helps you keep your machine working well. Here is a table that shows the most frequent problems and how you can solve them:
| Issue | Description | Resolution |
|---|---|---|
| Film Jamming | The pouch gets stuck if you feed it wrong or use one that is too thick. | Follow the guide for pouch thickness and use the reverse button to clear jams. |
| Sealing Problems | The edges may lift or not stick because of low heat or pressure. | Use the right pouch size and run the document through the thermal laminator again if needed. |
| Overheating and Burning | The machine may get too hot if you use it for too long. | Let the thermal laminator cool down after heavy use. |
| Wrinkles and Bubbles | These happen if you feed the document wrong or set the wrong temperature. | Check the temperature and try running the document more slowly. |
| Cloudy or Hazy Finish | Low-quality pouches or dirty rollers can cause a cloudy look. | Use good pouches and clean the rollers often. |
Tip: Always read your machine’s manual before you start. This helps you avoid most problems.
Keeping your thermal laminator clean helps it last longer and work better. Follow these steps to keep your machine in top shape:
Wipe the rollers with a soft cloth and a mild cleaner to remove sticky glue.
Check the feed tray for any stuck paper or film before you use the machine.
Look at the temperature settings to make sure the thermal laminator heats up right.
Adjust the pressure if you see marks or damage on your documents.
Use only pouches that match your machine’s needs.
Lubricate moving parts with the right oil from the manufacturer.
Inspect the machine for worn or broken parts and replace them if needed.
Note: Clean your laminator often to prevent jams and keep your documents looking clear.
You have learned that a dry laminator uses heat and pressure to protect papers. Using a dry laminator helps teachers keep things safe and neat. In schools and offices, you get many good things:
Charts and flashcards last longer
You save money over time
Cleaning is simple and you can use things again
It helps keep classrooms tidy
If you want to look at different models, ask suppliers for help. Here are some options:
| Model Type | Width Options | Film Thickness | Speed Options | Extra Features |
|---|---|---|---|---|
| Standard | 27" and 40" | 3 to 10 mil | 3 to 10 ft/min | Trimmer, cooling fans |
| Deluxe | 27" and 40" | 3 to 10 mil | 3 to 10 ft/min | Trimmer, cooling fans |
| Professional | 27" and 40" | 3 to 10 mil | 3 to 10 ft/min | Trimmer, cooling fans |
Think about what you need and read reviews before picking a laminator.


